SAML Single Sign-on (SSO)
SAML Single Sign-on allows your organization members to access k-ID Compliance Studio using your existing identity provider credentials. This feature is only available to organization admins and streamlines user authentication across your development team.
Prerequisites
- You must be an Admin or Owner of your k-ID organization
- Access to your organization's Identity Provider (IdP) with admin privileges
- Your IdP must support SAML 2.0
Step 1: Configure Your Identity Provider
First, you'll need to create a new SAML 2.0 application in your Identity Provider. The exact steps will vary depending on your IdP, so you may need to consult their documentation.
Required SAML Configuration
When creating your SAML application, use these values:
| Field | Value |
|---|---|
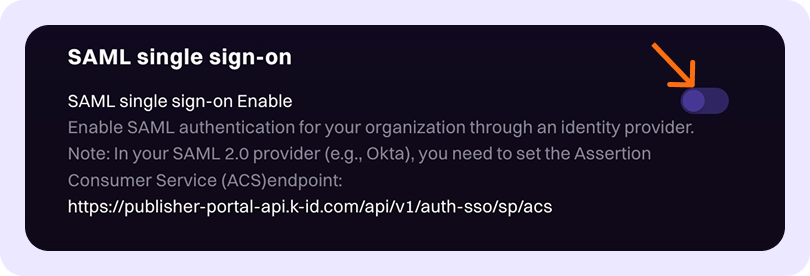
| Single Sign-on URL | https://publisher-portal-api.k-id.com/api/v1/auth-sso/sp/acs |
| SAML Assertion Claim | email or http://schemas.xmlsoap.org/ws/2005/05/identity/claims/emailaddress |
Step 2: Obtain IdP Metadata
After creating your SAML application, your Identity Provider will provide you with IdP metadata. This metadata contains essential configuration details and certificates needed for the SSO integration.
The metadata will typically be available as:
- A downloadable XML file
- A metadata URL
- Raw XML text that you can copy
Step 3: Enable SSO in k-ID Compliance Studio
Now you'll configure SSO within k-ID Compliance Studio:
-
Navigate to Organization Settings
- Go to Administration → Organization
-
Access Settings Tab
- Click on the Settings tab at the top of the page
-
Enable SAML SSO
- Locate the "SAML single sign-on" section
- Toggle the option to enable SSO
-
Configure Metadata
- Paste your IdP metadata (obtained in Step 2) into the provided field
- Ensure the entire XML metadata is included
Step 4: Test Your Configuration
Before activating SSO for your organization:
-
Click "Test SSO"
- This will initiate a test authentication flow
-
Complete Authentication
- You'll be redirected to your Identity Provider
- Log in with your corporate credentials
-
Verify Success
- If successful, you'll be redirected back to the Settings page
- You should see a confirmation that the test was successful
Troubleshooting
If you encounter issues during setup:
Common Problems
- Incorrect URLs: Double-check that the Single Sign-on URL matches exactly
- Certificate Issues: Ensure your IdP metadata includes valid certificates
- SAML Assertion Mismatch: Ensure you have correctly mapped the user's email address to one of the accepted SAML assertions.
- User Mapping: Confirm that user email addresses in your IdP match those in k-ID
Getting Help
If you continue experiencing issues with your SAML SSO configuration, our support team is here to help:
📧 Contact Support: support@k-id.com
Please include the following information when contacting support:
- Your organization name
- Identity Provider being used
- Screenshots of error messages (if any)
- IdP metadata (with certificate redacted)
Once SAML SSO is successfully configured and tested, your organization members will be able to log in to k-ID Compliance Studio using their corporate credentials, streamlining access management and improving security.
User Login Process
When your organization members log in to k-ID Compliance Studio using SSO, they will need to:
- Enter Organization Domain - Users must provide your organization's domain (a short, unique identifier for your organization) on the login screen
- Authenticate via IdP - They'll be redirected to your Identity Provider to complete authentication
- Access Portal - Upon successful authentication, they'll be logged into k-ID Compliance Studio
Make sure to share your organization's domain identifier with all team members who will be using SSO to access the portal.