Age verification
Age verification is becoming increasingly important as new regulations require platforms to verify user ages before providing access to certain features or content. k-ID's Compliance Development Kit makes compliance simple by providing a comprehensive, jurisdiction-aware verification system that adapts to local legal requirements.
This guide walks you through implementing age verification in just a few steps, allowing you to quickly meet regulatory requirements while providing a smooth user experience.
Use the k-ID Dev Explorer, an open source developer sandbox, to test age verification flows and view all traffic in an event log. You can also use it as a starting point for your own age verification implementation.
Prerequisites
Before you begin, you'll need:
- A k-ID Product: Create and configure your product in the k-ID Compliance Studio
- API Key: Generate your API key from the Developer Settings page of your product in the Compliance Studio
- Webhook Endpoint (optional but recommended): Set up a secure HTTPS endpoint to receive verification results. For more detail, see Webhooks.
Step 1: Initiate age verification
Call the /age-verification/perform-access-age-verification API to create a verification request. This returns a unique URL where users can complete their age verification.
Use the API reference with your API key to quickly generate your Age Verification URL.
For your implementation, this should be a server-to-server call to protect your API key from being exposed in client-side code.
Example request
POST /api/v1/age-verification/perform-access-age-verification
Content-Type: application/json
Authorization: Bearer your-api-key

{
  "jurisdiction": "GB",
  "criteria": {
    "ageCategory": "ADULT"
  }
}
Example response
{
  "id": "7854909b-9124-4bed-9282-24b44c4a3c97",
  "url": "https://family.k-id.com/verify?token=eyJhbGciOiJFUzM4NCIs..."
}
The jurisdiction parameter ensures compliance with local regulations (such as setting "GB" for UK requirements), while the ageCategory: "ADULT" criteria verifies users meet the age criteria requirements defined in that jurisdiction.
Step 2: Display the verification interface
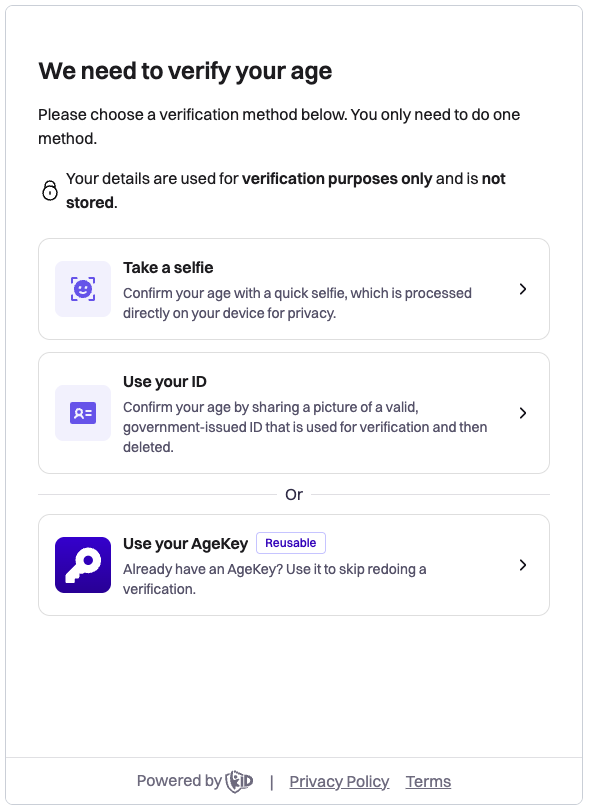
Use the returned URL to create an iframe in your website or app. Users complete their verification through this interface, with available methods automatically adapting to jurisdictional requirements.

HTML Implementation
<div id="verification-container">
  <iframe
    id="verification-widget"
    src="VERIFICATION_URL"
    width="100%"
    height="600"
    frameborder="0"
    allow="camera;payment;publickey-credentials-get;publickey-credentials-create">
  </iframe>
</div>
The iframe presents users with multiple verification methods such as:
- AgeKey: A reusable and anonymous age-proof generated after an initial verification process.
- Facial Age Estimation: Privacy-preserving age estimation using a device's camera
- ID Document Verification: Government-issued ID verification
The specific methods available depend on the jurisdiction and your product configuration. For more detail, see Verification Methods
Step 3: Handle verification results
Once the user has successfully completed the age verification, or the user has retried the maximum number of times and hasn't succeeded, you can receive verification results. Implementations should use a combination of client-side and server-side methods: client-side events are best for controlling UI elements, while for data integrity, the actual results should come from either a webhook or a call to /age-verification/get-status.
For detailed information about analyzing verification results, including field presence rules, status types, and implementation guidance, see the Verification Event Contract.
Client-side (DOM events)
Use DOM Events for responsive UI updates when verification completes. For detailed information about the event structure, see Verification.Result.
Listen for the Widget.ExitReview event to determine when to close the age verification UI. This event is emitted when the user clicks the 'Done' button, indicating the flow is complete and the iframe should be closed or hidden.
const handleMessage = (event) => {
  const message = event.data;
  if (message.eventType === "Verification.Result") {
    if (message.data.status === "PASS") {
      // User passed verification - update UI immediately
      console.log("Age verified:", message.data.ageCategory);
      updateUI();
    } else if (message.data.status === "FAIL") {
      // User failed verification - update UI immediately
      console.log("Verification failed:", message.data.failureReason);
      updateUI();
    }
  }

  if (message.eventType === "Widget.ExitReview") {
    // Close the verification UI when the user clicks 'Done'
    closeVerificationUI();
  }
};

window.addEventListener("message", handleMessage);
Server-side (webhooks, API calls)
Use webhooks or API calls for data integrity and reliable state management. For data integrity, always verify results with events from webhooks or by calling /age-verification/get-status rather than relying solely on DOM Events.
Webhooks
For detailed information about the webhook event structure, see Verification.Result.
Configure your webhook endpoint to receive Verification.Result events:
{
  "eventType": "Verification.Result",
  "data": {
    "id": "7854909b-9124-4bed-9282-24b44c4a3c97",
    "status": "PASS",
    "ageCategory": "adult",
    "method": "id-document",
    "age": {
      "low": 25,
      "high": 25
    }
  }
}
API calls
Query the verification status with the verification ID with /age-verification/get-status. For detailed information about analyzing verification results, including field presence rules, status types, and implementation guidance, see the Verification Event Contract:
GET /api/v1/age-verification/get-status?id=7854909b-9124-4bed-9282-24b44c4a3c97

Response:
{
  "id": "7854909b-9124-4bed-9282-24b44c4a3c97",
  "status": "PASS",
  "ageCategory": "adult",
  "method": "id-document"
}
What's next?
Now that you've implemented basic age verification, explore these resources to enhance your integration:
- API Reference Documentation: Detailed documentation of all age verification APIs
- Verification Methods: Configure specific verification methods and scenarios for your product
- Webhooks Setup: Implement robust webhook handling for production systems
- Best Practices: Implement best practices to ensure security and a reliable user experience
- Pre-launch Checklist: Review requirements before going live (contact k-ID support for the latest checklist)
With k-ID's Age Verification API, you can quickly achieve compliance with age verification regulations while providing users with a smooth, privacy-focused verification experience.